Showing posts with label Snack. Show all posts

Friday, January 03, 2020

All's Fair: Cranberry-Almond Teacakes

For the first time last Fall, I entered the baking competition at my local harvest fair. There were lots of entries, of all shapes and sizes, including an outrageously decadent-looking pan of cinnamon rolls! And while I didn't win anything, these Cranberry-Almond Teacakes still say "blue ribbon" to me :-)

cranberry-almond teacakes

Cranberry-Almond Teacakes

Dry ingredients:
1 1/2 cups all-purpose flour
1 teaspoon baking powder
1/2 teaspoon kosher salt
1/2 teaspoon ground ginger
1 cup dried cranberries

Wet ingredients:
1/2 cup butter, melted and cooled
3/4 cup granulated sugar
1 teaspoon pure vanilla extract
1 teaspoon pure almond extract
2 large eggs, room temperature
1/2 cup whole milk, room temperature

Topping:
1/4 cup sliced almonds
1/4 cup granulated sugar

Preheat oven to 350 degrees Fahrenheit. Line a standard 12-cup muffin pan with muffin liners; set aside.

Stir flour, baking powder, salt, and ground ginger together in a small bowl. Add the dried cranberries and toss in the flour mixture, breaking up any clumps as you go. In a large bowl (or the pan you used the melt the butter, if it's big enough), cream butter and sugar together until fluffy, then mix in extracts and eggs. Blend in half of the dry ingredients, stir in the milk, then add the remainder of the dry ingredients and combine until just smooth. Divide evenly among the liners (about 2/3 full each). Sprinkle tops with about 1 teaspoon each almonds and sugar, then bake for 20-22 minutes, or until a toothpick comes out clean. Serve warm or at room temperature.

cranberry-almond teacakes

Notes: Why "teacakes?" Well, they're not sweet enough to be cupcakes, yet they're still too delicate to be muffins! These are perfect, as you may have guessed, with a cup of tea for elevenses, or even as a mid-afternoon snack. The crumb is tender and rich, and the little bit of ginger adds a pleasant warmth. The headiness of the almond extract is divine!

>o<

Friday, February 03, 2017

Double Dip: Baby Greens and White Bean Dip

Let's face it: sometimes a delicious, creamy dip makes all the difference when trying to eat your raw veggies. But what if that dip already had veggies in it? I'd call that brilliant! As a bonus, this dip just happens to be dairy-free, perfect for sharing with anyone who might need to avoid it. With beans for a boost of protein, and heart-healthy olive oil as well, go ahead—keep dipping!

Baby Greens and White Bean Dip with Mini Peppers


Baby Greens and White Bean Dip

Ingredients:
Extra-virgin olive oil
1-2 cloves garlic, sliced lengthwise (remove "sprout" in center if starting to turn green)
5 oz. baby spinach, baby kale, baby Swiss chard, or a combination
1 15-oz. can cannellini beans, drained and rinsed
Red wine vinegar (or fresh lemon juice, if you have it)
Salt and freshly ground pepper to taste

In a large saucepan over medium-low heat, gently sautee garlic in a few Tablespoons of oil until fragrant, then add beans and stir to coat and warm through, absorbing the garlicky oil. Add greens in batches and wilt, seasoning sparingly with salt and pepper with each batch, until all the greens are cooked (at this point, you actually have a nice little side dish of greens and beans - keep that in your back pocket for another time!). Let the mixture cool.

In a blender or food processor, blend greens and beans with a few more Tablespoons of olive oil, a splash or two of vinegar, and salt and pepper to taste. The dip should be creamy, but still retain some texture. Serve with veggie sticks, pita chips, or use as a spread on sandwiches!

Notes: Adapted from this recipe, which is extremely delicious in its own right :-)


>o<

Sunday, February 21, 2016

Lost in Translation: Lyonnaise Garlic and Chive Dip

Foods often acquire funny names based on their appearance, sometimes silly, sometimes merely descriptive—and while those names pass into acceptance in their native tongue, they are often hard to swallow when you need to explain them in a different language. In the Lyon region of France, there is a traditional (and extremely delicious) cheese mixture called cervelles de canut, which has the unfortunate and rather gruesome translation of "silk-worker's brains". What probably started as a tasteless joke has now been memorialized for all time. The reference shouldn't stop you from making this dish, however, which is great as a snack or an easy appetizer, and comes together in just a few minutes. And if you're still feeling bothered by that name? Don't worry—it's all in your head ;-)

Ricotta Cheese Garlic and Chive Dip on Bread


Garlic and Chive Dip

Ingredients:
15 oz. whole-milk ricotta cheese
2 cloves garlic
1/4 cup finely chopped chives (or scallions)
2-3 teaspoons champagne vinegar
2-3 Tablespoons extra-virgin olive oil
Salt and freshly ground pepper to taste

Grate or finely mince garlic into a medium bowl, then add ricotta and mix. Drizzle in about two teaspoons of vinegar, add the chives and stir again until combined—the consistency should be thick but spreadable. Season with salt and pepper, then add a few Tablespoons of oil. Mix until everything is incorporated, then taste and adjust seasonings, oil and vinegar to your liking. Serve with raw veggies or crusty bread. Store any unused portion in an airtight container in the fridge; give it a quick stir before serving again as the dip will separate a bit as it sits.


Notes: My simplified version of cervelles is adapted heavily from Rachel Khoo and Dorie Greenspan's excellent recipes. Red wine vinegar is traditional, but I found the champagne vinegar to be delicious, and of course fresh lemon juice would be wonderful, too. Don't be too concerned with exact quantities or measuring the liquid ingredients precisely—just eyeball and adjust as you go!

>o<

Sunday, January 17, 2016

It's Gran-Tastic!: Maple-Pecan Granola with Cranberries

The New Year is a time when people make resolutions and set goals for themselves, many of which are health-related. And no wonder, after a few months of decadence and indulgence! As you might guess, my definition of healthy includes making as much as possible at home, the better to know what goes into my food and where it was made and grown. Now, you know me, and I don't shrink from fat and calories, but I want to be sure my ingredients are the best quality I can find and afford, minimally processed and locally sourced if at all possible. This makes things healthier for me, my community, and the environment—the ultimate win-win-win!

All the same, sometimes you want your food to "feel" healthy, and granola is often what jumps to mind as you look for something to start your day. Thankfully, it's also wonderfully easy to make, with very few ingredients and some time in a slow oven. The best part? It simply tastes great, too :-)

Maple-Pecan Granola with Cranberries


Maple-Pecan Granola with Cranberries

Ingredients:
5 cups rolled oats (regular, "old-fashioned" oats)
1 cup chopped pecans
1 teaspoon ground cinnamon
1/2 teaspoon kosher salt
1/2 cup pure maple syrup
1/4 cup neutral-tasting oil (such as grapeseed or extra light olive oil)
1/2 cup dried cranberries

Preheat oven to 250 degrees Fahrenheit. Line a large baking sheet with foil or parchment paper and set aside.

In a large bowl, combine oats, pecans, cinnamon and salt, stirring until everything is fully combined. Measure out syrup and oil into the same measuring cup and pour all at once over the oat mixture. Stir again until all the oats and pecans are completely coated. Pour onto prepared sheet and spread the granola into an even layer. Bake for about 45 minutes to an hour, stirring gently every 10-15 minutes, until the granola is dried and toasty. Remove and let cool completely; mix in the cranberries and store in an airtight container. Serve as a cereal with milk, sprinkle over yogurt, eat out of hand as a snack, or (so much for healthy) enjoy with a bowl of ice cream ;-)

Notes: This recipe is adapted from Bob's Red Mill. My version is not super-sweet, but just enough so to satisfy. You can definitely use whatever nuts, spices, and dried fruits you would like to suit your taste—anything goes!


>o<

Sunday, November 22, 2015

Recipe Roundup: The Final Countdown

Thanksgiving is just days away, and chances are you have your menu planned and ingredients stocked for the big day. And yet, maybe you'd like just a few more items on offer to round out the meal and ensure all your guests have something they can enjoy. Of course, these add-ons better be quick, easy, and absolutely scrumptious, too!

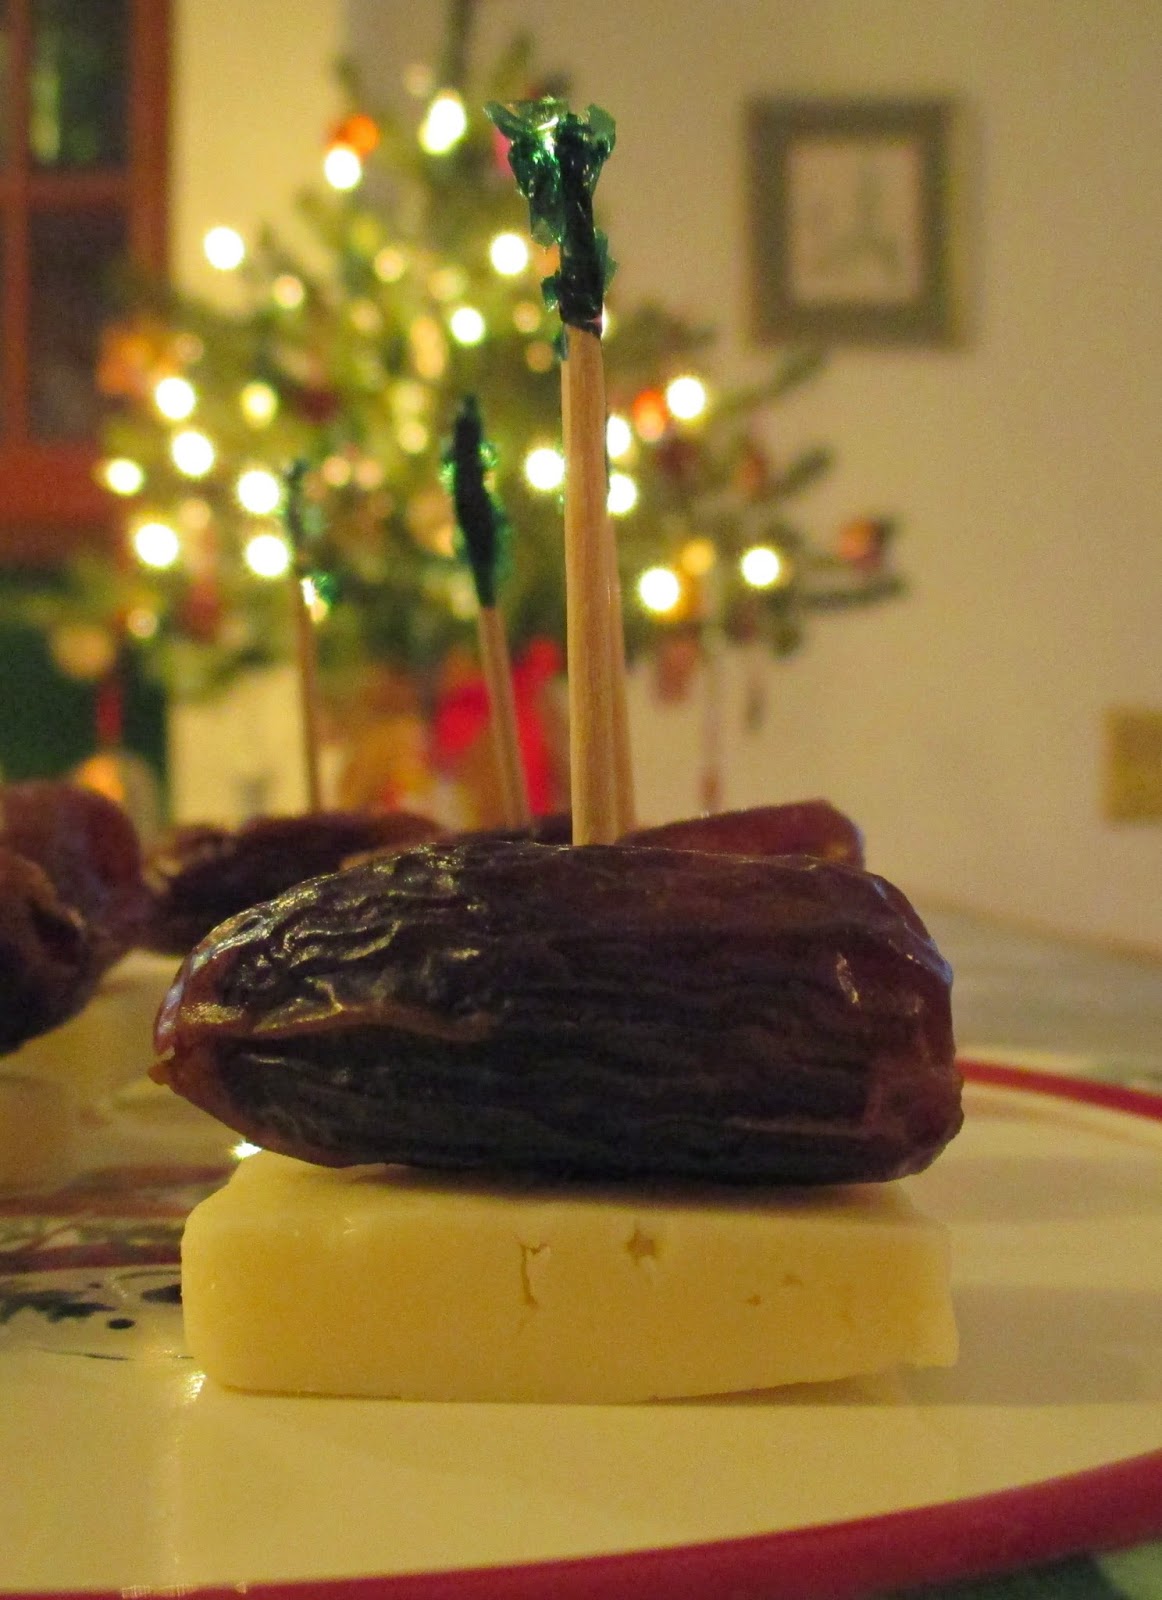
Cheese and Dates: You can't go wrong with two ingredients, especially when they pair as well as these do. I personally love an aged cheddar with the dates, but any cheese will be perfect. Vegetarian/Gluten-Free


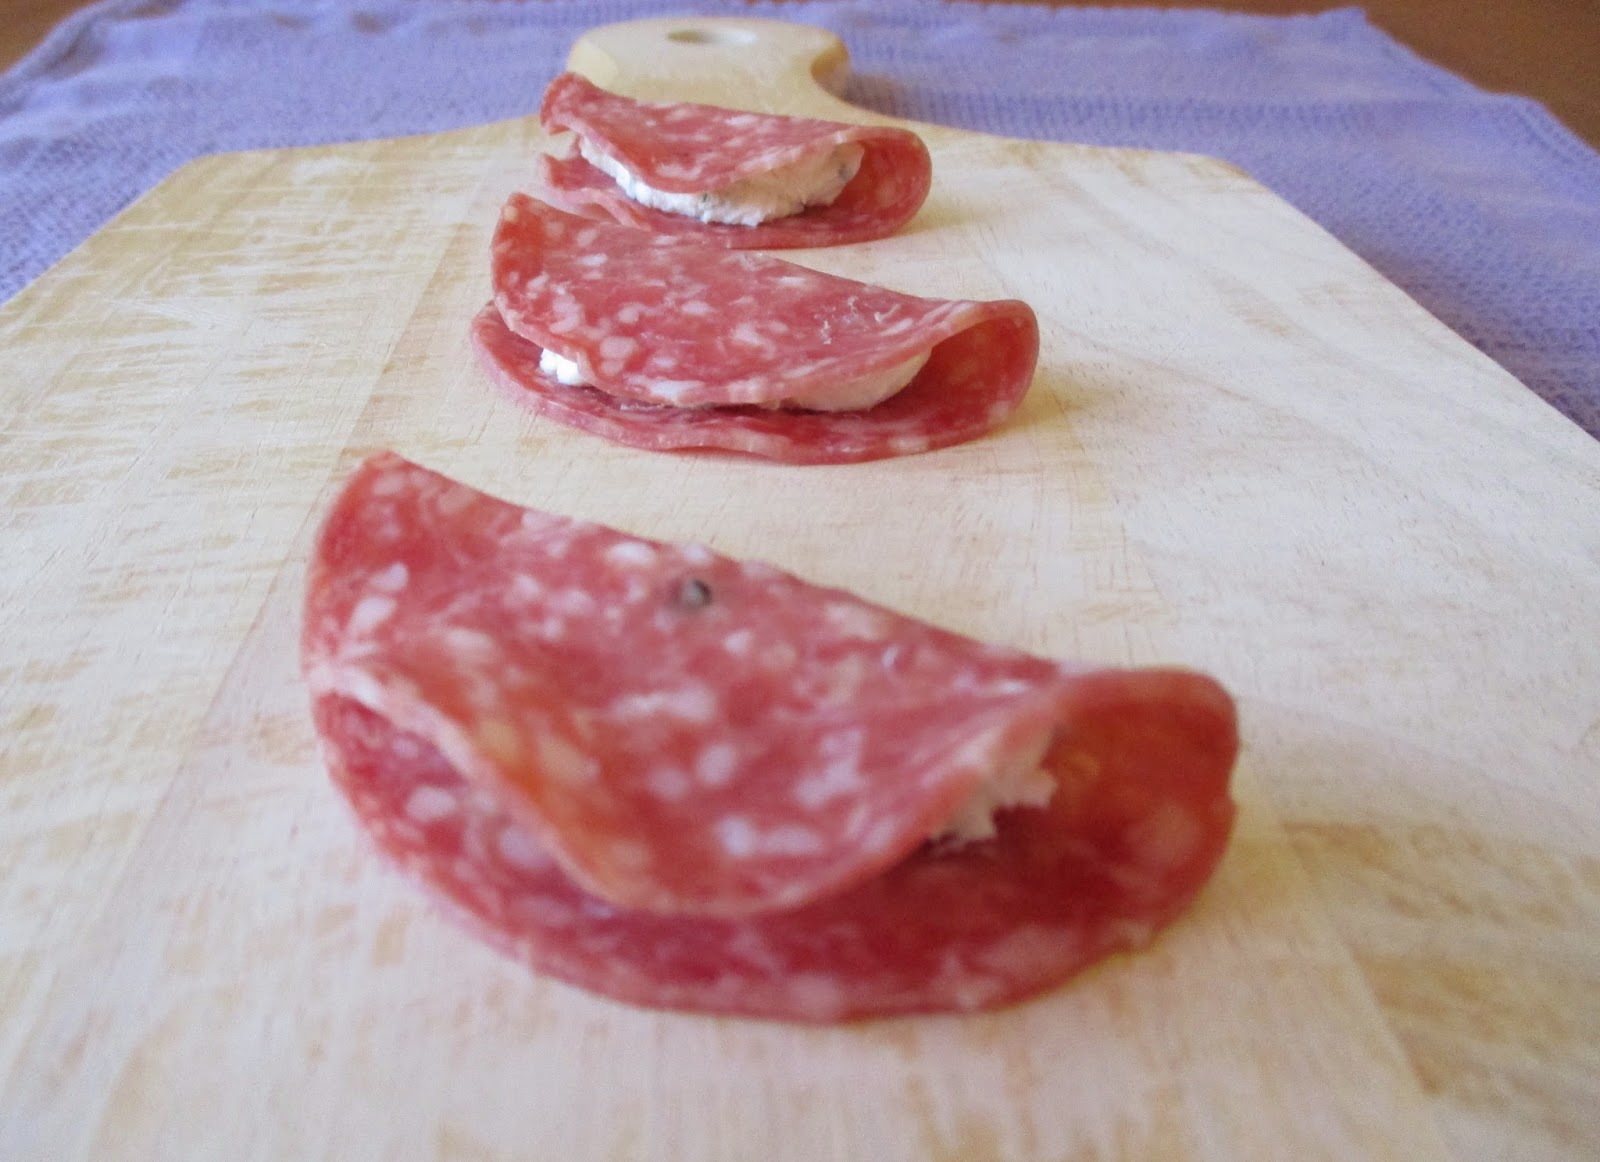
Salami and Cream Cheese: Another two-ingredient wonder - just keep the components stashed in the fridge, and you're moments away from making as few or as many as you need! Gluten-Free


Catalan Spinach: Amazingly simple and unbelievably fast, but also bursting with great flavor. This dish can be whipped up while the turkey rests and the other sides are reheating in the oven. Vegetarian/Vegan/Gluten-Free


Cranberry-Orange Sauce: Easily made in advance and stashed in the fridge in anticipation of the big day. Any leftover sauce can be reheated and spooned over store-bought ice cream or pound cake for a stress-free dessert. Vegetarian/Vegan/Gluten-Free (if using Cointreau, water, or juice for the liquid)


Individual Pumpkin Custards: A make-ahead treat that stores and transports easily, already portioned and ready to eat! Vegetarian/Gluten-Free


>o<

Wednesday, September 09, 2015

Tried and True: Lemon-Rosemary Zucchini Bread

For some reason, traditional zucchini bread recipes tend to be strongly spiced with things like cinnamon, nutmeg and cloves. These are certainly great flavors, but they completely obscure the delicateness of the squash. I suspect the people who developed these recipes never really liked zucchini at all! So I thought about how I like zucchini best—with things like butter, lemon, and fresh herbs - which also happen to be traditional flavors in many parts of the world. The result was a hit, where all the components served to enhance one another perfectly:

Lemon-Rosemary Zucchini Bread


Lemon-Rosemary Zucchini Bread

Ingredients:
One large or two medium zucchini, shredded and excess moisture squeezed out (use a clean towel or strong paper towels—you should have roughly 1 to 1 1/2 cups of zucchini)

1 1/2 cups all-purpose flour
1 teaspoon baking powder
1/2 teaspoon baking soda
1/2 teaspoon kosher salt
Zest of one lemon
1 teaspoon finely chopped fresh rosemary

1/2 cup butter, softened
1/2 cup sugar
2 large eggs
1/2 cup whole-milk sour cream (or plain yogurt)

Prep zucchini per above and set aside. Butter an 8 x 8 inch square pan and preheat oven to 350 degrees Fahrenheit.

In a small bowl, stir together flour, baking powder, baking soda, salt, lemon zest and rosemary. In a large bowl, cream butter and sugar together until light and fluffy; stir in eggs until combined, then add the zucchini and mix together. Gently stir in half the flour mixture, followed by the sour cream, then the remaining flour mixture until just combined. Scrape batter into prepared pan and bake for about 35 minutes, or until a toothpick comes out clean. Serve warm or at room temperature. Cover and refrigerate any leftovers (the flavor is even better the next day).

Notes: Like all quick breads, this is really just cake in sheep's clothing, and as such it is delicious with your coffee in the morning or a spot of tea in the afternoon. For an easy substitute, use one cup fresh blueberries in place of the zucchini. For more sweetness, stir 1/2 cup confectioner's sugar together with just enough fresh lemon juice to drizzle over cooled bread.


>o<

Monday, April 13, 2015

There's an App for That: Salami and Cream Cheese Appetizers

When I was little, my mother used to take slices of cream cheese and swaddle them lovingly in blankets of salami, arranging them neatly on a plate as she went. The resulting tidbits made a fantastic snack, and I know I enjoyed quite a few myself in the process! Unfortunately, when something is so simple, it's often easily forgotten—certainly, I don't think I've ever made them in the ensuing (ahem) decades. Thankfully, I was reminded of this fantastic combination very recently, and knew they would be just as welcome in this digital age as they were all those years ago:

Salami and Cream Cheese Appetizers


Salami and Cream Cheese Appetizers

Ingredients:
Sliced salami, preferably nitrate/nitrite-free (local, if available!)
Cream cheese, softened

Dollop a small amount of cream cheese in the center of each slice of salami (my slices were only two inches across, so a 1/2 teaspoonful was enough). Fold salami over cream cheese and repeat until you have as many as you need!

Notes: My store happened to have cream cheese mixed with scallions, and this worked very well. Other good additions to the cream cheese would be finely chopped chives, olives, or cornichons. For more contrast with the rich, salty salami, add some finely chopped dried figs, walnuts, and a pinch of cinnamon to your cream cheese.


>o<

Thursday, January 29, 2015

Recipe Roundup: Nibbles and Bits

Whether you're putting out a huge spread for the big game, hosting a cocktail party, or just having a few friends over for drinks, make sure you have a few tasty morsels on hand to round out the rest of your menu!

The Union Square Cafe's Bar Nuts: You can't go wrong with this little nibble—easy to make, and even easier to eat, these will please your guests to no end (or at least until the end of the evening).


Cheddar Buttons: Who says you can't make your own cheesy crackers? Customize these by using your favorite cheese, and add herbs and spices to suit your palate (pepper jack would be a great cheese option here).


Cheese and Dates: Simple, yet effective. Again, the choice of cheese is yours—or make several kinds if you can't decide. Try using dried figs or apricots in addition to dates as well.


Pistachio Bars: Don't forget dessert! Use your favorite roasted, salted nuts in place of the pistachios, or a combination of nuts for even more flavor. Either way, the salty-sweet combination is sure to be a (dare I say it?) touchdown!


>o<

Monday, January 26, 2015

How to Milk a Chicken: Chicken Butter

There's a long-standing joke among some friends about "chicken butter"—a substance which makes perfect sense after a good meal and several glasses of wine, but obviously doesn't exist. Yet truth is stranger than fiction, and one of those friends eventually stumbled across this recipe for (what else) Chicken Butter. The legend was now reality. Plus, I knew I wanted to try making it myself! So when I had those two Tablespoons of rendered chicken fat, I put them to use to make this intriguing little spread:

chicken butter spread dip

I've paired my chicken butter with slices of radish as the French would do, but it would certainly be wonderful on a sandwich, smeared over cornbread, or swirled into cup of butternut squash soup. The sweetness would pair well with other raw veggies like carrots and cauliflower, too. So the next time you laugh at something and think, "Now, that was silly", think again. You never know what you might find!


Chicken Butter

Ingredients:
2 Tablespoons rendered chicken fat
4 Tablespoons butter
1 teaspoon (heaping) real maple syrup

Have a all ingredients at room temperature. Mix together in a small bowl until completely smooth and very creamy. Store any leftover butter in an airtight container in the fridge for up to a week, or freeze for up to three months.

Notes: I used regular, salted butter for my recipe, so did not use additional salt as indicated in the original recipe. The rendered fat by itself has a lovely, delicate flavor, which is what must make it so wonderful for cooking. In fact, my research revealed that New York delis used to have jugs of liquid schmaltz on their tables for customers to pour over their food, much like syrup in a pancake house :-)

>o<

Thursday, January 22, 2015

Beautifully Rendered: Rendering Chicken Fat

As you already know, I like to make use of as much as possible—and I can definitely do more. Getting the most out of everything you grow and buy not only saves you money, but gives you more delicious options to enjoy as well! One easy thing I tried recently was rendering the fat from some chicken skins. You can ask your butcher or farmer for chicken skins and fat on their own, but on this occasion I was already buying chicken thighs and used their skins for this little project.

Technically, this is not schmaltz, but it's the same idea. I followed this process using the skins from four decent-sized thighs (about 2 lbs. total). After removing the skins from the thighs, I snipped them into smaller pieces with a pair of scissors. I added them to a heavy-bottomed saucepan with one bay leaf, a splash of water, precisely four peppercorns, and got to simmering:

rendering chicken fat
Showing some skin.

Even though it was only a small amount of skin, it did take about an hour and twenty minutes to finish rendering. The pieces of skin did stick to the bottom of the pan during the process, but I VERY carefully nudged them around with the tip of a spoon from time to time. I knew the end was near when the bubbling started to die down significantly. The skins eventually turned into crackling (cook's treat!), and I was left with about two Tablespoons of that lovely golden liquid to use for another time:

chicken skin cracklings
Crackling good.

Now, I know what you're thinking: two Tablespoons isn't exactly an embarrassment of riches. But I have a plan! That two Tablespoons is exactly enough for me to make... well, in the words of the Prime Minister, wait and see :-)

>o<

Monday, January 12, 2015

Get Your Goat: Goat's Milk

If you've even glanced at my recipes, you've already guessed I have no fear of butter. Things like whole milk and heavy cream are at the top of my list, too. These, of course, all come from cow's milk—and I appreciate every drop! But sometimes I'm in the mood for a change, for something decidedly NOT cow. The easiest way to achieve this is simple: go for goat!

goat milk yogurt with honey pistachios
Breakfast of champions.

Goat's milk yogurt has been a favorite of mine for almost as long as I can remember. Like a good chevre, yogurt made from goat's milk has a light tanginess that's incredibly pleasing to the palate. Strained in cheesecloth for 24 hours, the yogurt thickens to the consistency of whipped cream, and is heavenly with a scattering of chopped pistachios and a drizzle of honey.

Whey out.

Now, unless you have a goat in your backyard (or know someone who does), goat products will likely be more expensive than their bovine counterparts. So consider it a treat, find the best you can afford, and choose something local to ensure it's as fresh as possible. Never tried it? Give it a shot—the variety of cheeses alone makes it worthwhile, and you can also find other things like goat's milk butter, ice cream, skin care products, and salted caramel sauce! Even better, it's easy to make something goaty at home—VERY satisfying, indeed!

Know what else? Goats are awfully cute, too :-)

Gettin' nosy.

>o<

Monday, December 29, 2014

Just One More Thing: Cheese and Date Cocktail Nibbles

It's been a busy year: you've worked hard, the holidays have been hectic, and all you want to do now is relax. Still, you may yet have more guests to feed, more family to entertain, and possibly another party or two before the year is out—and the thought of making just one more thing is enough to tip you over the edge! But I'm here to help, with a simple, quick, and very tasty little nibble that can be thrown together in no time:

cheese date snack appetizer


Cheese and Date Cocktail Nibbles

Ingredients:
Cheese
Dates (pitted)

Slice cheese into pieces roughly the length and width of your dates, and about 1/4 inch thick. Skewer a date onto a toothpick, followed by a piece of cheese. Repeat until you have as many as you need, or until you run out of cheese and dates :-)

Notes: You can certainly stuff the cheese inside the dates by slicing the dates open along one side, and even add a pecan or walnut half as well. Use your favorite cheese for these, or try a variety—a good extra sharp cheddar goes extremely well with the sticky sweetness of the dates. If you don't like dates, use another kind of dried fruit like apricots or plums.

>o<

Monday, November 24, 2014

Go Nuts: The Union Square Cafe's Bar Nuts

I think almost every celebrity chef has their own version of the Union Square Cafe's bar nuts. In fact, I've been making my own adaptation of Ina Garten's version for many years, and they've always been quite a hit. But I realized it was finally time to take a step back and try the original recipe - no interpretations, no substitutions, just the real deal as printed in the Cafe's own cookbook:

bar nuts snack appetizer
Belly up.


The Union Square Cafe's Bar Nuts

Ingredients:
1 1/4 lbs. mixed, unsalted nuts (about 20 oz.)
1 Tablespoon butter, melted
2 Tablespoons fresh rosemary, coarsely chopped
2 teaspoons kosher salt
2 teaspoons dark brown sugar
1/2 teaspoon cayenne pepper

Preheat oven to 350 degrees Fahrenheit.

Spread nuts evenly on a baking sheet and toast in the oven until fragrant, about 10 minutes. Combine the remaining ingredients in a large bowl, then add the nuts as soon as they come out of the oven and toss to coat. Serve warm and enjoy!

Notes: I think I would have liked a little more butter and rosemary, and maybe a bit less salt. However, I'll have to reserve judgement until I visit the Cafe and try these straight from the source :-) You can certainly use a single type of nut instead of a mix—pecans and cashews work extremely well with the other flavors here.

>o<

Monday, November 17, 2014

Cute as a Button: Cheddar Buttons

For years, I made a recipe for Peabody Cheddar Wafers I found in the November, 2000 issue of Yankee Magazine. The process involved cutting the butter into the flour mixture, resulting in crackers that tasted like cheesy pie crust—and there was nothing wrong with that! But lately, I was looking for something a bit different, and started to research recipes for Cheddar Pennies. The basic ingredients were identical in all the recipes I found, with the option to add extras like cayenne pepper, paprika, dry mustard or even fresh herbs. The method used to make them is similar to that of making cookies, and the result is a smooth dough with great cheese flavor. Needless to say, this mouse is hooked—and since mine are quite a bit larger than pennies, I had to choose a more suitable name for them ;-)

cheddar button crackers snack appetizer
No sewing required.


Cheddar Buttons

Ingredients:
1/2 cup butter, softened
1/2 lb. (8 oz.) extra sharp cheddar, finely grated
1 cup all-purpose flour
1/4 teaspoon ground paprika

Preheat oven to 350 degrees Fahrenheit.

In a large bowl, cream butter and paprika together until smooth, then blend in cheese. Mix in flour until fully combined and a smooth dough forms (you may need to use your hands toward the end). Separate the dough into halves, then halves again, etc., until you have 32 pieces of dough. Roll each piece into a ball, then flatten between your hands until the buttons are about a 1/4 inch thick. Place buttons on a lined baking sheet as you go, then prick each button twice in an "X" pattern using a fork. Bake for about 15-17 minutes, or until the edges are crisp and golden.

Notes: This is a great little nibble for cocktails, or to go with soups and stews (or even by themselves when no one is looking). I was impatient and put my buttons in the oven right away, but you can chill them in the fridge first for about 15 minutes to obtain cleaner edges and a flakier texture. The dough can also be patted into a disc, wrapped, chilled, then rolled and cut into shapes. Alternately, roll dough into logs, wrap, chill, and slice before baking.

>o<